How to Create and Manage FBA/WFS Work Orders
Skustack’s FBA and WFS Work Orders enable you to effectively manage products that you intend to ship to either FBA or WFS fulfillment centers. With such tasks, you can methodically organize inventory designated for FBA/WFS by consolidating items into a dedicated destination bin. This approach streamlines your warehouse processes and helps you prepare inventory for your fulfillment partners.
FBA and WFS Work Orders can be created and managed both from the Admin portal and the Skustack app.
App
FBA and WFS Work Orders
The Work Orders module is located within Skustack’s Work Orders tab and allows you to create and manage your FBA and WFS Work Orders on the go directly through the Skustack app.
Create Work Orders
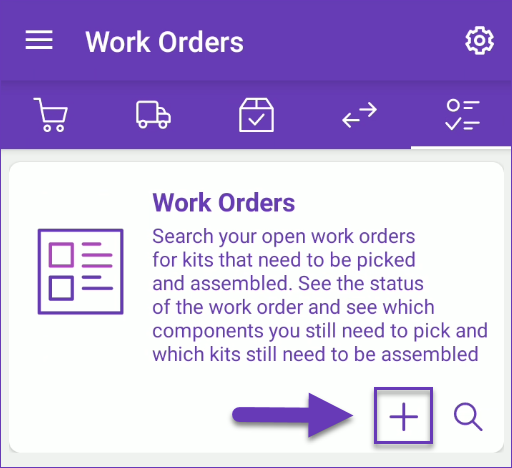
To create FBA and WFS Work Orders via the Skustack app:
Navigate to the Work Orders module and tap the + icon.
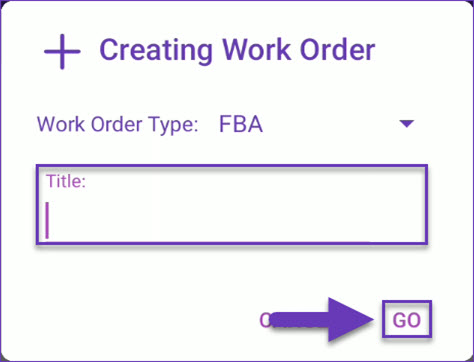
From the Work Order Type dropdown, select FBA or WFS.
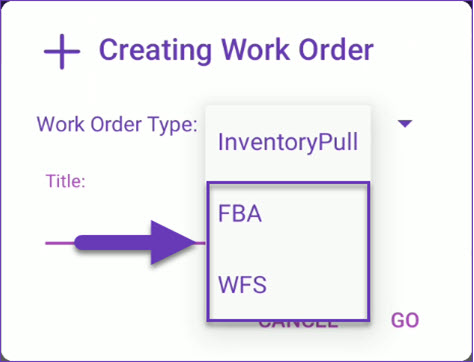
Enter the desired Title and tap Go.
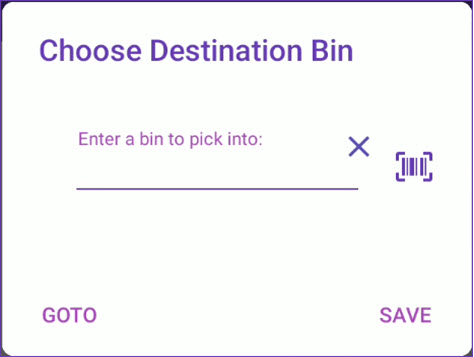
Scan/enter a Destination Bin and tap Save.
Scan the ProductID/UPC to add items to the work order and tap Set Qty to specify how many units you intend to pull.
Scan units to add to the picked qty or enable the Set Quantity and Pick box to adjust the number manually and pick the units directly.
Search Work Orders
You can search for existing FBA and WFS Work Orders by using one of the available search modes:
Search By Work Order ID – Opens a single Work Order using the internal Sellercloud ID.
Search By Title – Opens a single Work Order using its title.
Search All – By default, this mode searches for all Work Orders. Filter by Type – FBA or WFS. Optionally, narrow down the search results even further by searching for a specific SKU/UPC or Pick Status:
All
Zero Picked
Zero or Partial Picked
Partial Picked
Fully Picked
Manage Work Orders
To work on an open FBA/WFS request, navigate to the desired Work Order:
Choose a Destination bin.
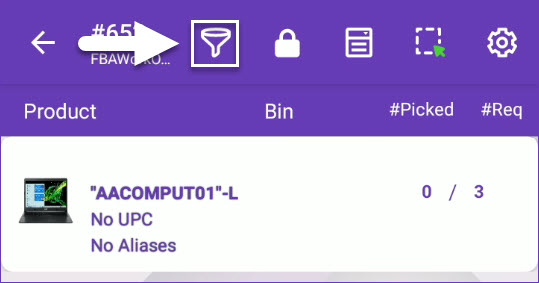
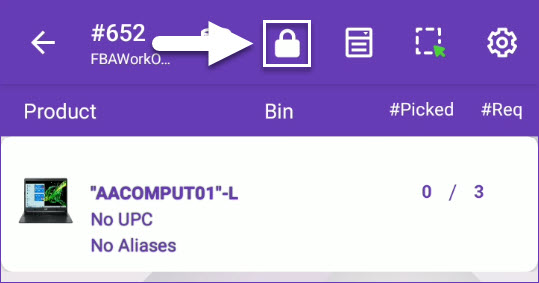
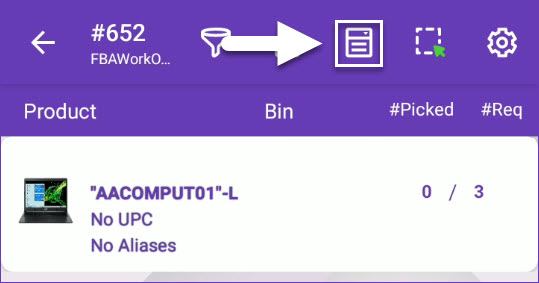
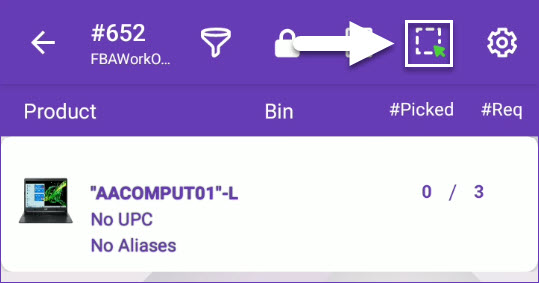
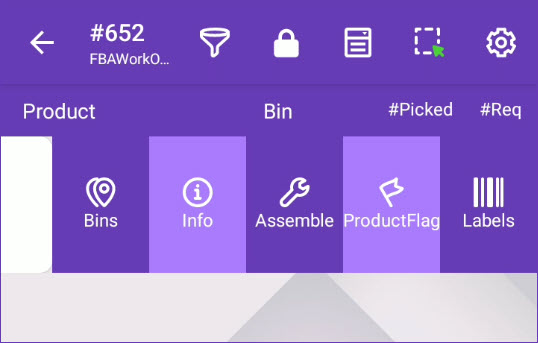
Next to the task ID, you’ll find several icons that allow you to:
Filter – Tap on this icon to refine the list of displayed products by:
Status – Filter by product’s picked status.
Region – If your warehouse is organized by Regions, you can choose one from the dropdown list.
Lock/Unlock Order – When Skustack’s Warehouse Management setting Allow Unlock Work Order is enabled, you can tap this icon to unlock the Work Order and add products to it.
Select Product Identifiers to Display – Tap and choose the product identifiers to be displayed in the work order:
UPC
Aliases
Product Name
Destination Bin – Tap on this icon to select a destination bin for the gathered products.
Swipe the header down to see the total number of items and view/add notes.
Swipe a product to the left to reveal shortcuts to other actions:
Bins – Tap the icon to see all bins where the product is stored (bins will show only if you’re logged into a bin-enabled warehouse).
Info – Tap to be directed to the Product Info module.
Product Flag – Tap on this icon to add a Product Flag.
Labels – Tap on this action to print product labels for each item. If the work order is of type FBA, the printed labels will contain the Sellercloud SKU and the FNSKU. If the required items are shadow products, the label will contain the shadow SKU and the FNSKU.
Assemble – If the product is a kit, this action allows you to initiate a kit assembly.
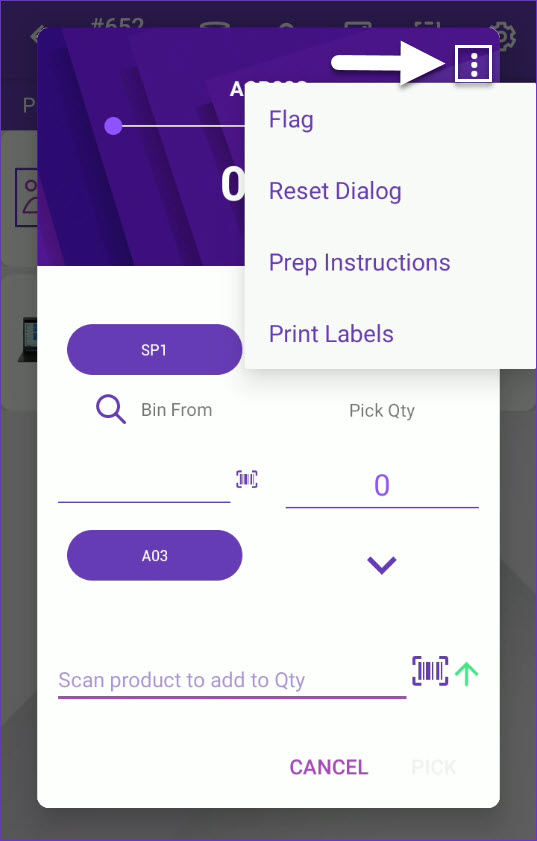
Scan the ProductID/UPC, or select the item on the screen. The product will open.
Scan/enter a bin, or select one of the suggested bins. The suggestion is based on the following factors:
The bin is sellable.
The bin type is Normal or Temp.
Primary bins will always be suggested first.
The bin with the most or least quantity will be suggested based on the client setting PickList Bin suggestion sort qty by ASC Order.
Scan units to add to the picked qty or adjust the number manually. To auto-populate the total quantity available for the scanned product in that bin, enable Skustack’s Warehouse Management setting Auto populate progress quantity when bin is selected.
Tap on the three dots menu in the upper right-hand corner to:
Flag – Use this option to Flag the item and indicate specific concerns.
Reset Dialog – Use this option to remove selected data from the picking dialog.
Prep Instructions – Tap on this option to view the product’s FBA preparation instructions.
Print Labels – Tap to print a custom number of product labels with the product’s Barcode. Use the up and down arrows, or simply add the required number of labels. Check the Include Product Name box, to include the product name in the labels. Once done, tap Print.
If the Lot Number workflow is enabled for your company and the product is set as expirable you must select a Lot Number before being able to pick it.
Tap Pick.
Admin
FBA and WFS Work Orders
The Skustack Admin portal lets you easily create new FBA and WFS Work Orders, as well as manage existing ones.
Create Work Orders
To create a new FBA/WFS Work Order:
Navigate to the Skustack Admin portal at https://xx.skustack.com (replace “xx” with your server ID or team name).
Enter your login credentials.
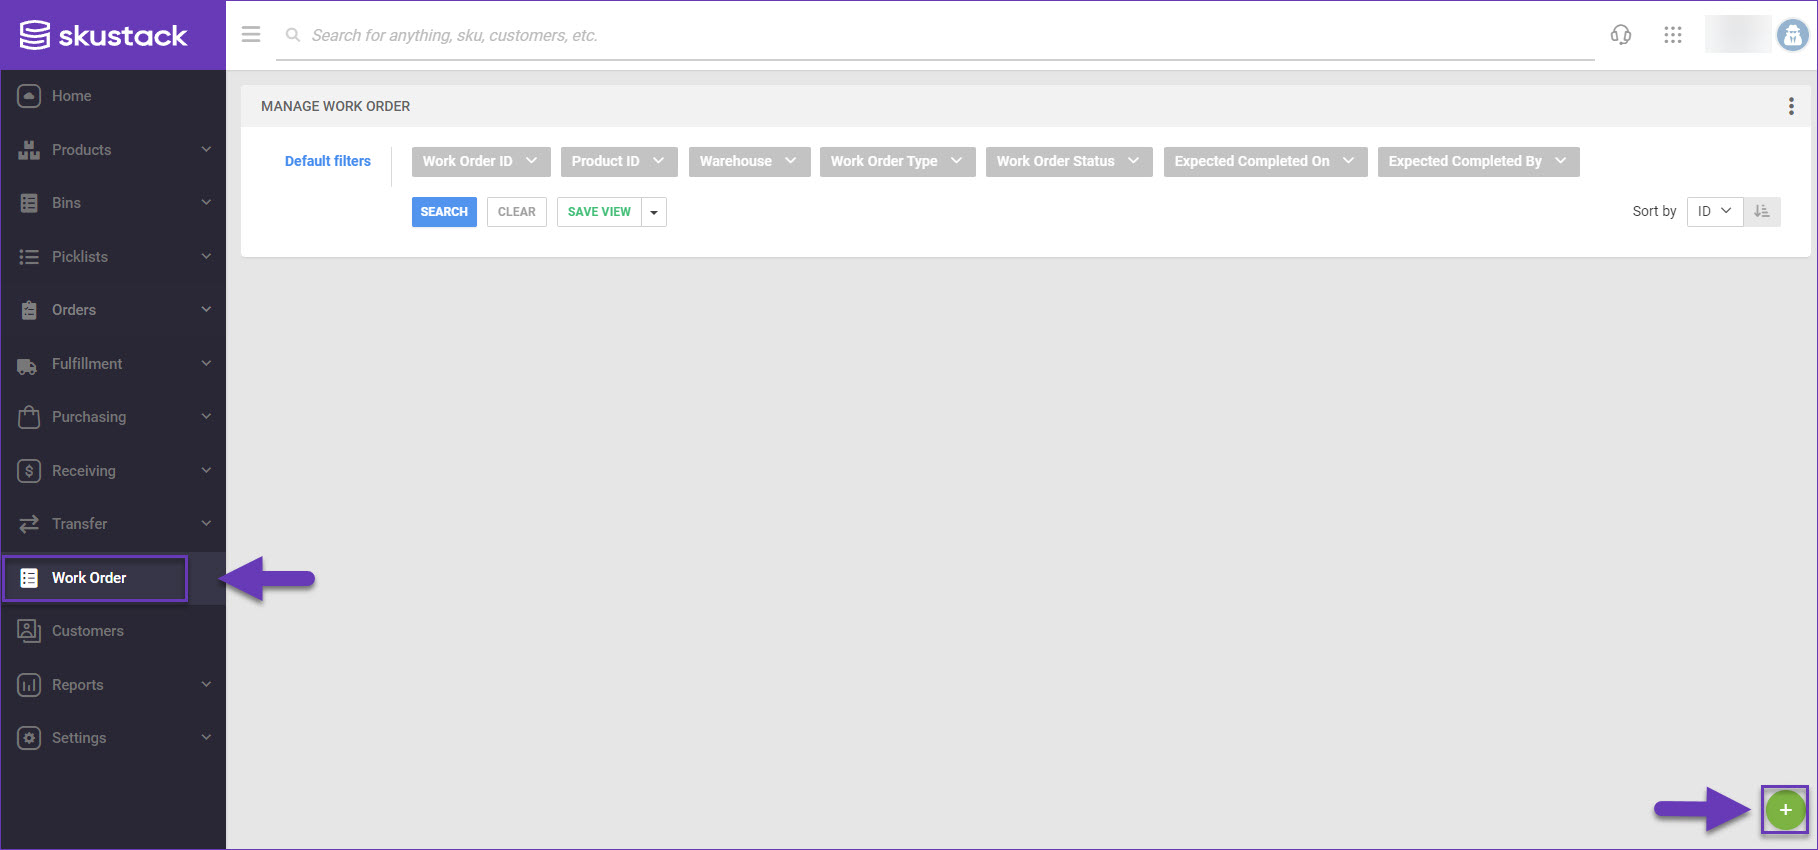
On the left, select Work Order and click on the + icon.
Enter the following details:
Work Order Title
Work Order Type – FBA or WFS.
Warehouse
Expected Completion Date

Click Add and the new Work Order will load on your screen.
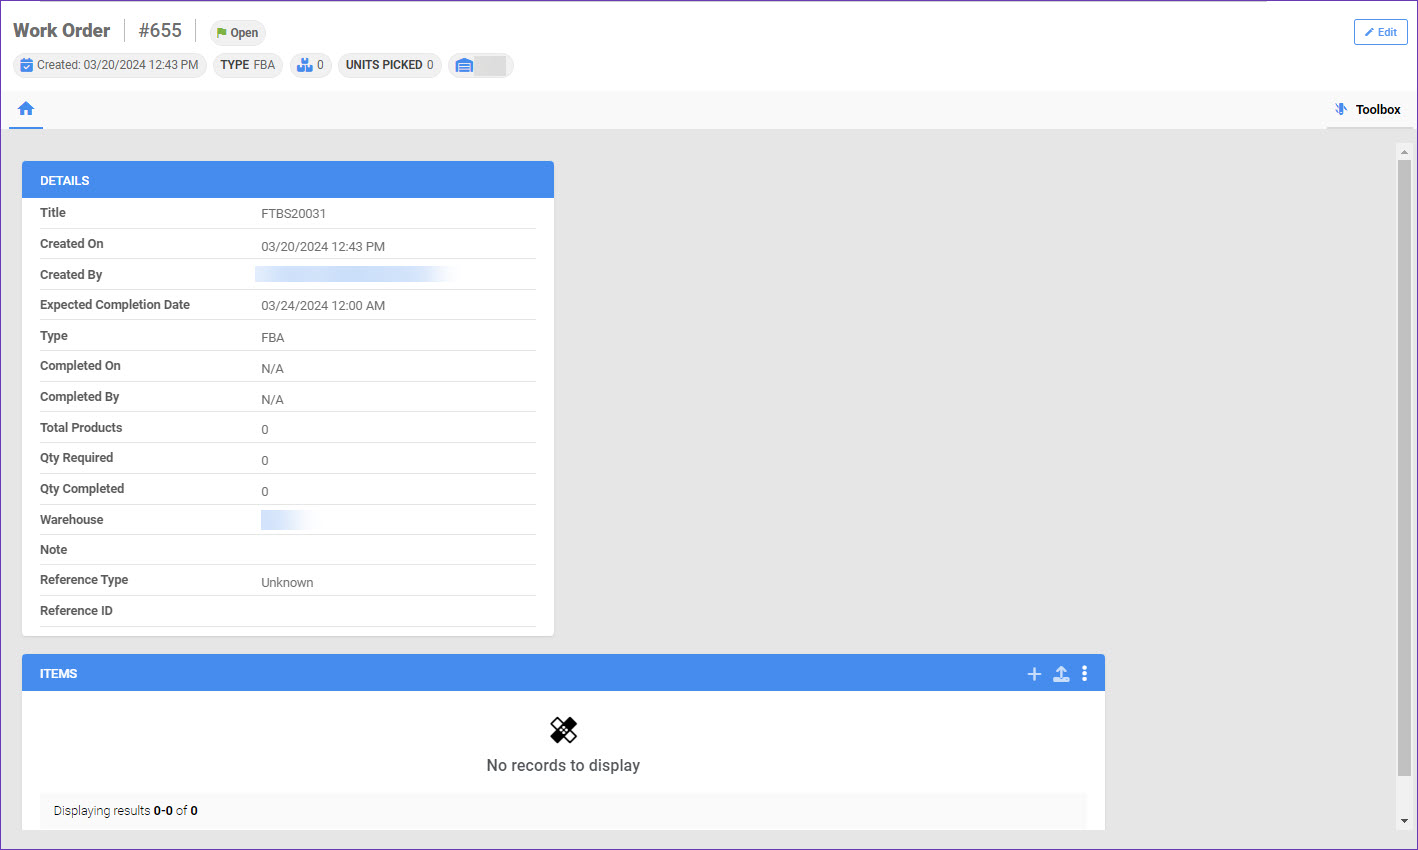
In the Items panel, you’ll find two methods to add products to the Work Order:
By searching and adding specific products
Via a Bulk Import.

Add Items
Next, proceed to add items to the new task. You can do that either individually or in bulk.
Individually
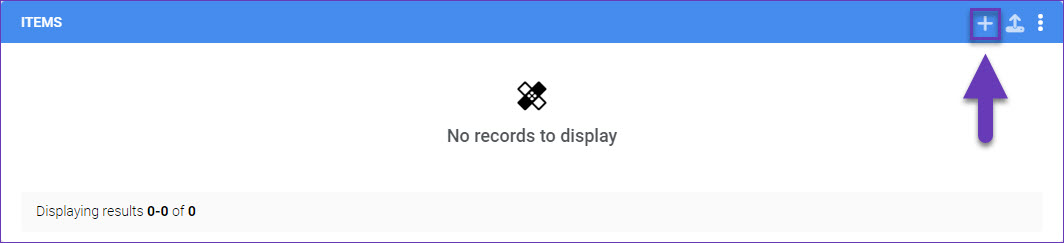
In the Items panel, click on the + icon.
Search for products by entering the required SKUs, separated by commas.
Select one or multiple products from your search results by checking the respective checkbox and populating the required quantity in the Qty field.
Click Add Selected and proceed with the selection or click Add Selected and Close, if done.
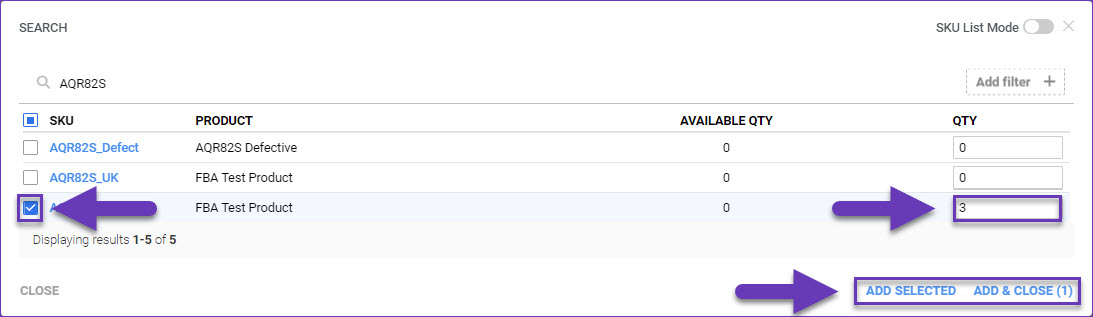
The chosen products will appear in the Items panel.
In Bulk
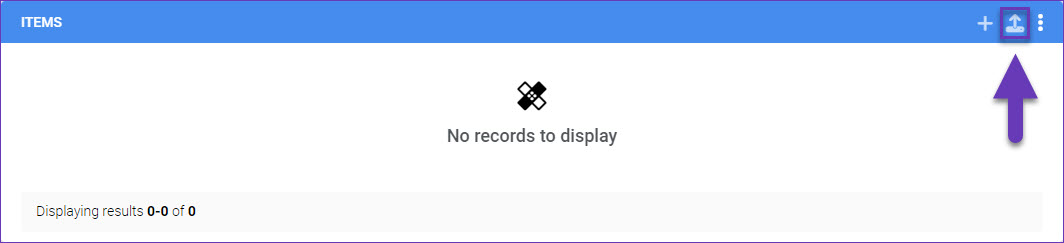
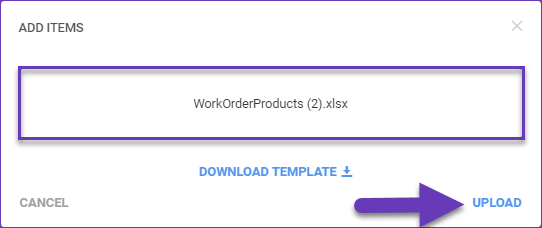
In the Items panel, click on the Bulk Import icon.
Click Download Template and select a location to save the file.
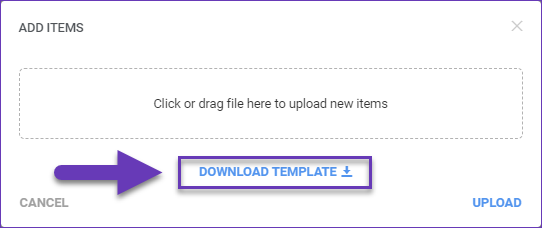
Open and populate the Excel file:
ProductID – Enter the SKU of the product that you intend to add.
WarehouseName – Enter the name of the warehouse, for which the work order applies.
TotalQtyRequired – Insert the number of items to add.

Once all required products have been added, save the file and return to the Bulk Upload prompt.
Add the saved file and click Upload and the products will appear in the Items panel.
Manage Work Orders
In this section, you will learn how to manage your existing work orders in the Skustack Admin. In addition to creating new work orders, you can also:
Search – By work order number, type, and status.
Edit Items – Add new products to the work order or delete existing ones.
Delete – Permanently delete work orders.
Close – Move Completed work orders into a Closed status.
Export – To either Excel or PDF format.
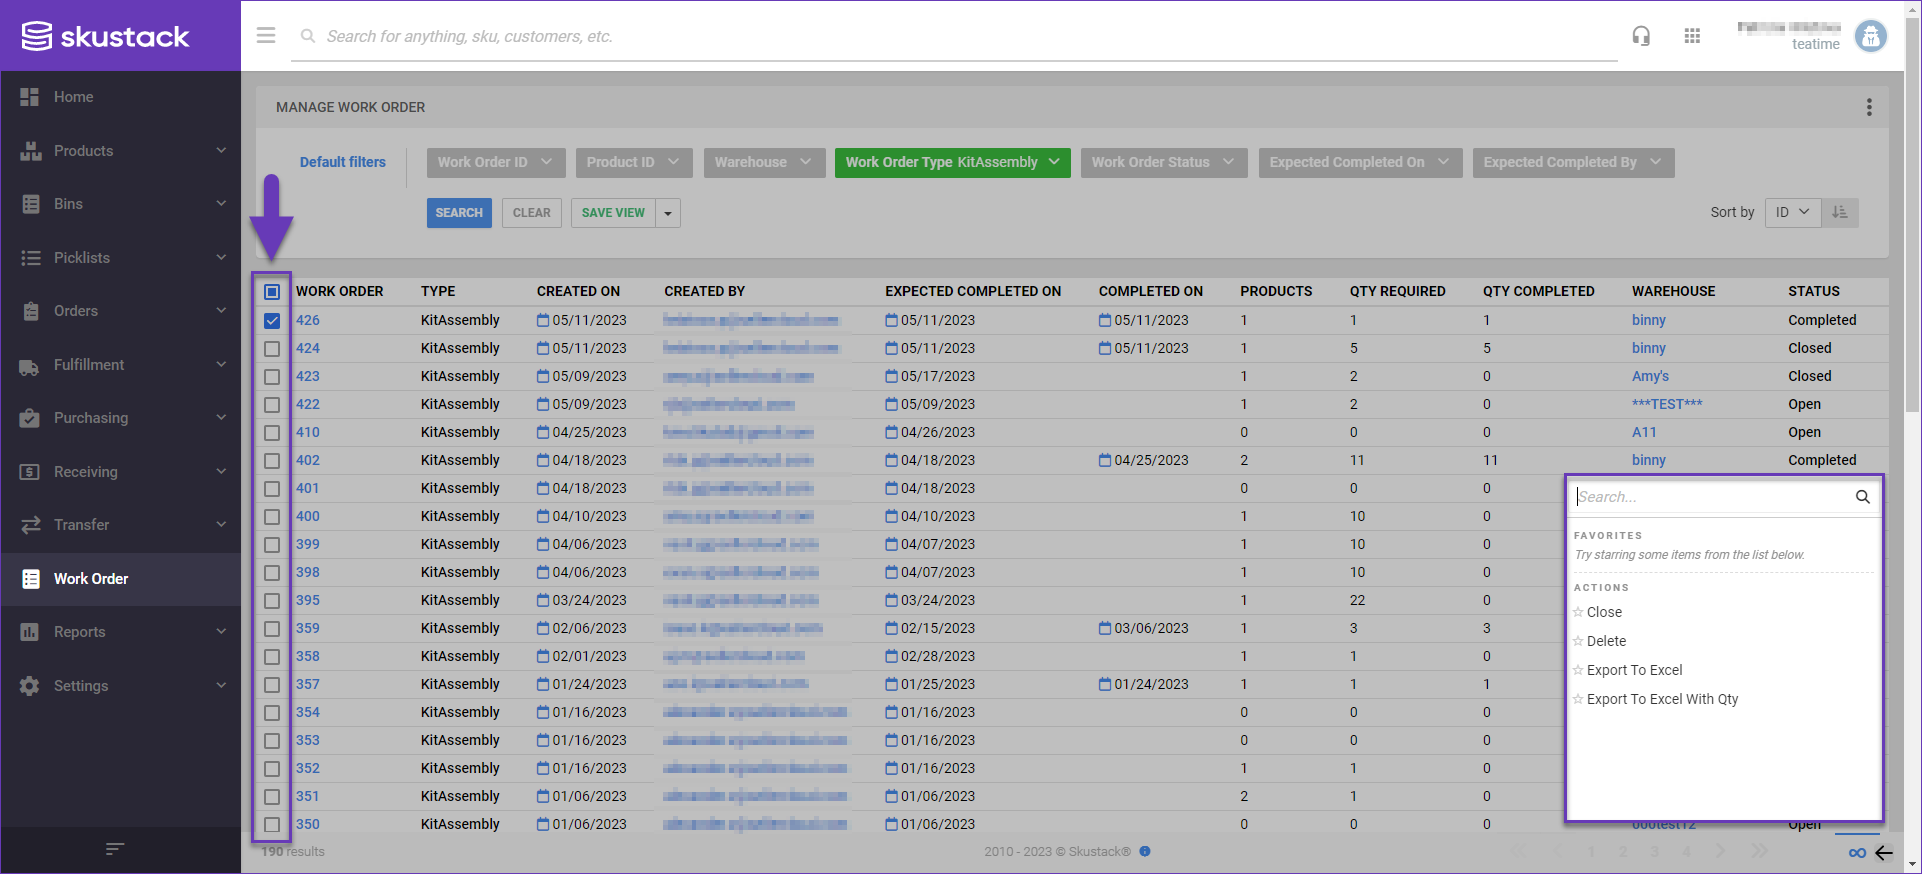
Search Work Orders
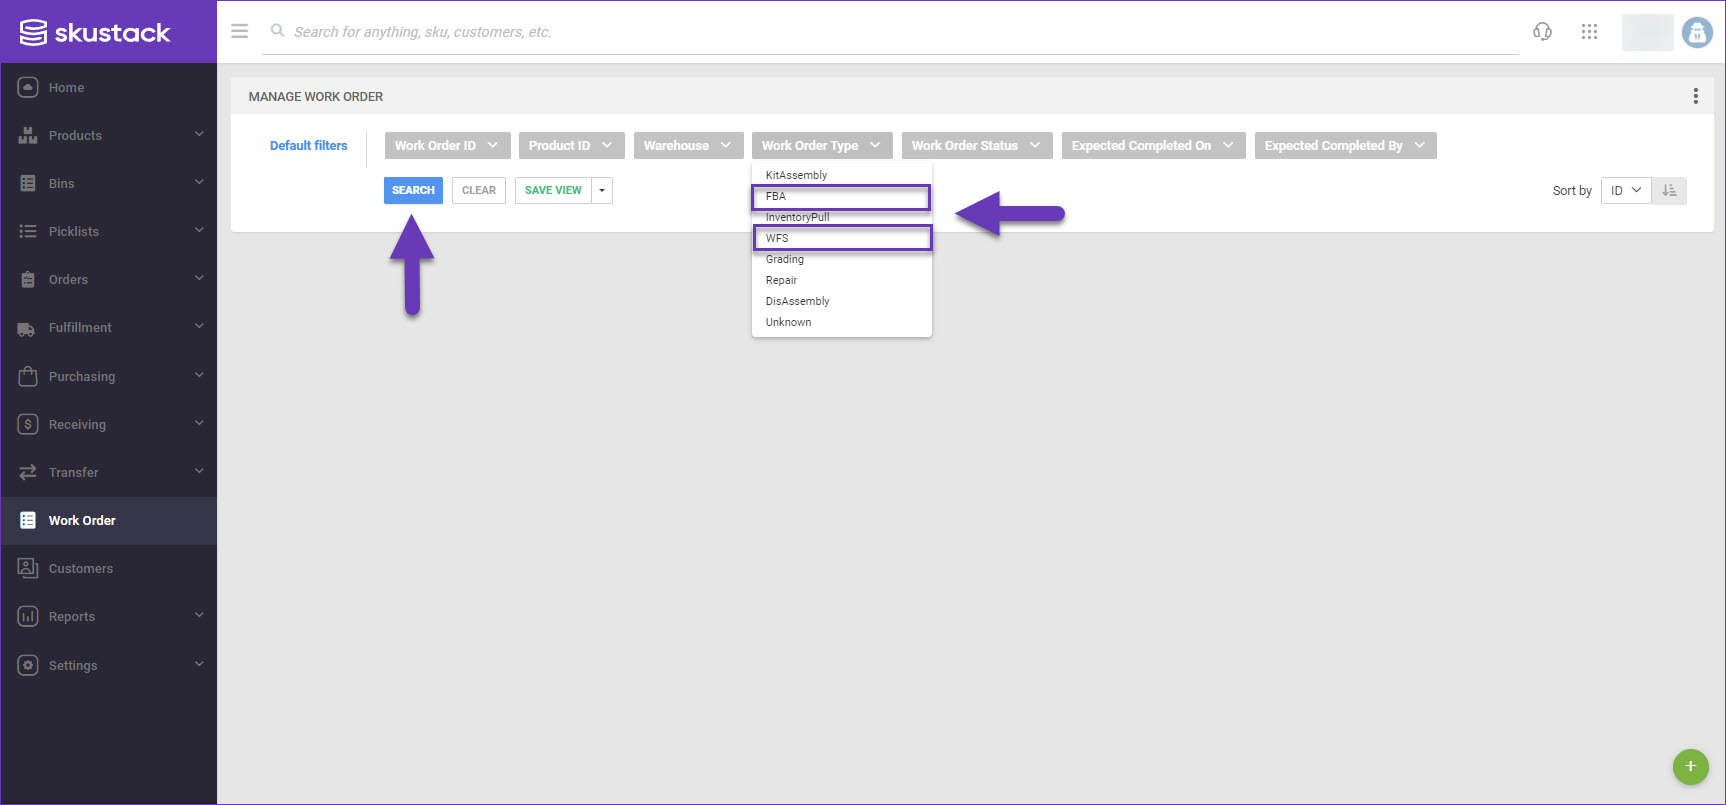
To search for existing Kit Assembly tasks in the Skustack Admin:
Navigate to the Work Order menu.
Configure your Default filters to ensure that the results display exactly what you need and select FBA or WFS as the Work Order Type.
Click Search. Each filter you apply gets highlighted. If a filter is gray or not displayed at all, it’s not active.
To manage the columns in the grid, click the three dots icon on the top right and select Customize Columns. You can:
Reorder columns by dragging them up or down in the list;
Hide columns by clicking the Trash icons;
Add columns by clicking Add column.
To arrange the data in a different order, use the Sort by menu.
To save your filtering and sorting options, click Save view, enter a Name, and click Save.
Edit Items
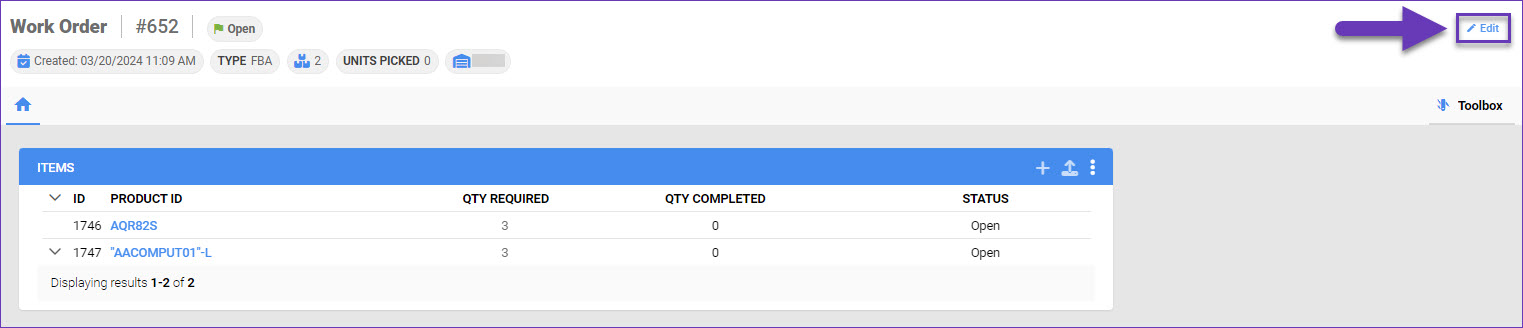
To edit items on a work order, follow these steps:
Open your desired work order.
Click Edit.
In the Items panel, you can update the Qty Required or use the trash can icon to delete an item.
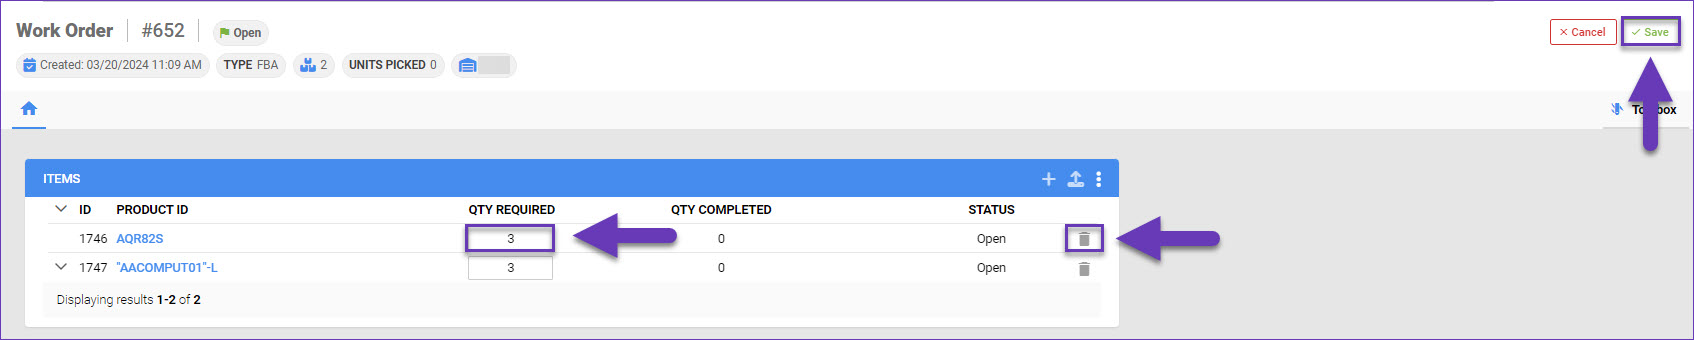
Once done, click Save.
Close or Delete Work Orders
To close or delete work orders, follow these steps:
Navigate to the Work order grid.
Search and select your desired work orders.
Access the Actions menu.
Click Close to update the status to Closed or Delete* to delete work orders.
Export Work Orders
Generating a document that includes the ID and item details of the work order can help ensure that the instructions are clear and easy to read. This can simplify the process of distributing the task to Skustack users within your warehouse. Work orders can be exported either in a PDF or Excel format. Note that exporting in a PDF format can only be done through the three dots menu on the Items panel of an individual work order.
Related Settings
| SETTING | DESCRIPTION |
| Validate serial globally | Client setting. Enables serial number validation in Skustack. Learn more about serial number validation and relevant client settings here. |
| Auto Close After Fully Assembled | Skustack’s Warehouse Management setting. When enabled, the work order status will be automatically updated to Completed. |
| Allow Unlock Work Order | Skustack’s Warehouse Management setting. When enabled, this setting allows you to edit/add products to Work Orders. |
| Auto populate progress quantity when bin is selected | Skustack’s Warehouse Management setting. When a bin is selected, the Pick Qty field will automatically be set to the total quantity available in that bin, up to the quantity required. |