Credit Memo
Not everything goes perfectly when receiving your Purchase Orders and Sellercloud has you covered with our Credit Memo tools.
To create a Credit Memo for a Purchase Order, we’ll start by opening the desired POs detailed page by finding it on the “Manage POs” page or searching for it in the universal search bar.
Once on the detailed page of the PO, we’ll go over to our “Actions” button and select “Create Related Credit Memo” from the drop-down menu.

This will create a related Credit Memo in Sellercloud, which you can jump to by clicking the “Credit Memo ID” at the top of the screen.
Now that you’re in the Credit Memo, you can ship your Credit Memo back to the Vendor by going to your “Actions” button and selecting “Ship Credit Memo.”
Type in the “QTY TO SHIP,” select the warehouse you are shipping from, add an optional “Receive Invoice#” or “Vendor Order ID,” and click the green “Ship Items” button to ship your Credit Memo.
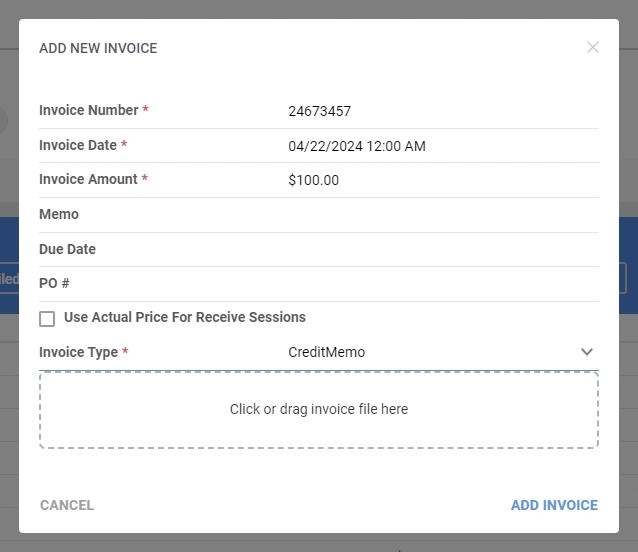
After you have shipped the Credit Memo, you can generate a Credit Memo Invoice to be sent to your Vendor for a refund. Go to the “Actions” button and select “Manage Invoices.”
You’ll go through the same steps to “Add New Invoice” as before, but instead select the Invoice Type “CreditMemo” before clicking “Add Invoice.”
In the Credit Memo’s detailed page, you can click the “Edit” button and link the “Shipping Session” to the Credit Memo by clicking the green “+ icon” on the “Existing Sessions” window and selecting the desired “Shipping Session.”
Once the Vendor has sent back the refund, you can apply the refund to the Credit Memo by going into the Credit Memo’s detailed page and selecting “Apply Payment” from the “Actions” button dropdown.